VMware : Adaptateur de stockage FC HBA listé deux fois sur l’ESXi

Depuis le 15/10/2022 la version ESXi 6.7 n’est plus supportée par VMware et la majorité des administrateurs sont en train de faire les migrations de leurs plateformes vers la version 7.

Dans ce blog post, je partage avec vous un petit bug que nous avons rencontré lors des processus de mise à jour de l’ESXi.

En effet, l’un des ESXi après l’upgrade détecte les cartes FC HBA comme vmhba2 et vmhba3 mais également une deuxième fois comme vmhba64 et vmhba65.

VMware : VxRAIL Manager 7.0.x les fichiers des logs

L’analyse des logs est l’une des taches le plus importantes lors d’une investigation de problème et ça devrait être la première chose à faire.

VxRAIL Appliance est basé sur SUSE Linux Enterprise Server 15 SP2, et la majorité des logs sont toujours situés sous le répertoire /var/log.

Le tableau suivant présente une vue d’ensemble des logs que l’on peut retrouver dans le VxRAIL manager :

Emplacement Contenu
/var/log/microservice_log/dayone.log Configuration initiale de l’Appliance VxRAIL première exécution
/var/log/microservice_log/short.term.log Informations sur les service de

VMware : Tips of the week #8

VxVerify est un outil/ python script conçu pour détecter les problèmes susceptibles de provoquer des complications ou des défaillances lors des mises à jour d’un cluster VxRail.

L’outil VxVerify décompresse un programme Python plus petit, appelé « minion », qui sera envoyé sur chaque ESXi. Ce « minion » examine l’état de l’hôte selon une liste des vérifications et les informations depuis l’interface iDRAC pour faire un bilan de santé pour chaque nœud et le cluster VxRAIL.

Le fichier VxVerify peut être téléchargé depuis

VMware : vSphere Snapshot Deep Dive


Un snapshot est une sorte de capture de l’état d’une VM à l’instant T qui nous permet de préserver l’état et de retourner à un état antérieur si besoin. Lorsque le snasphot est créé, le disque de base de la VM sera mis en lecture seule et toutes les nouvelles données ou modifications seront écrites sur un nouveau disque delta ou le disque enfant. Vous pouvez prendre un snasphot lorsqu’une VM est sous tension, hors tension ou suspendue

VMware : Tips of the week #7

Le saviez-vous qu’il est possible d’accéder à la console DCUI: Direct  Console User Interface d’un serveur vSphere ESXi à partir d’une connexion SSH sur l’ESXi.

Pour cela il suffit de taper la commande :

#DCUI

Pour quitter le DCUI, appuyez sur Ctrl C.

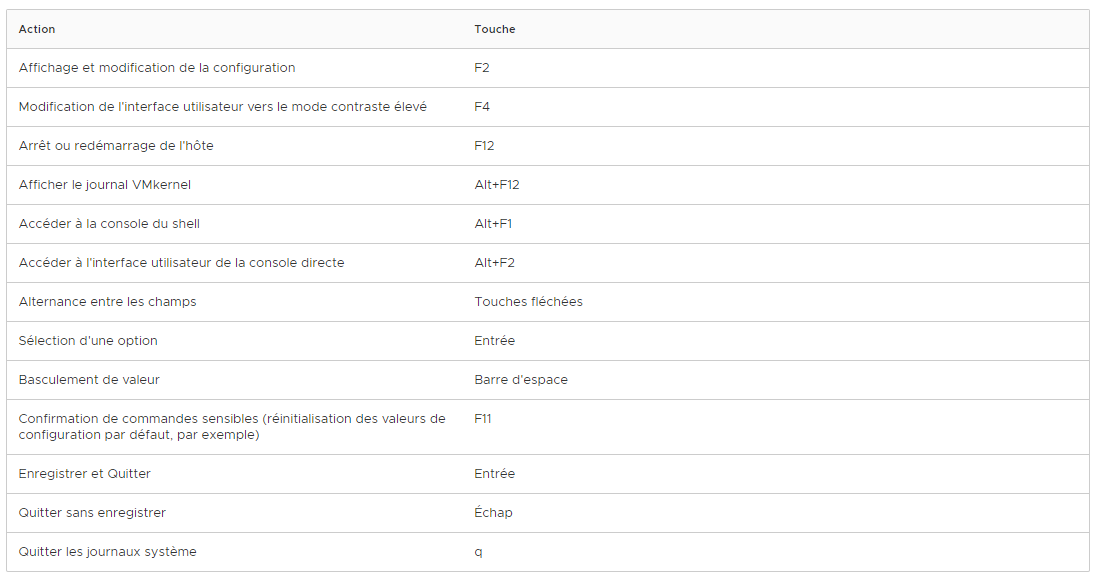
Les opérations clés disponibles dans la console directe comprennent :

  • Configuration des hôtes
  • Mise en place de l’accès administratif
  • Dépannage

La navigation dans la console directe vous permet de vous des opérations telles que :

Enjoy!

VMware : Tips of the week #6

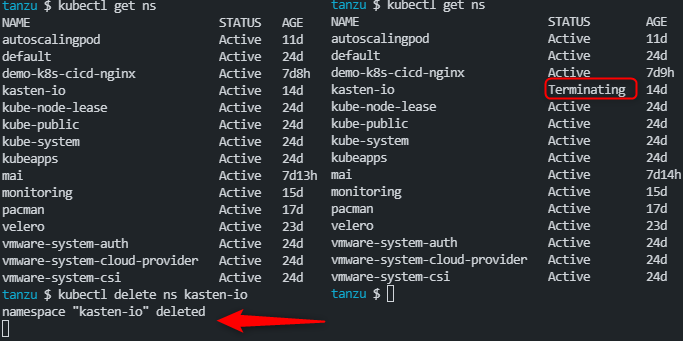
Quick tip to show you how to fix Kubernetes namespace deleting stuck in terminating state: 

In this case, you can manually delete your namespace that is stuck in the Terminating state:

STEP 1 : Create a temporary JSON file:

kubectl get namespace kasten-io -o json > tmp-kasten-io.json

STEP 2 : Edit your tmp.json file and remove the kubernetes value from the finalizers array and save the file.

STEP 3 : Executing the cleanup command

kubectl replace –raw “/api/v1/namespaces/kasten-io/finalize”

Veeam : How to install Kasten K10 on vSphere with Tanzu

Disaster recovery, backup solutions and recoverability in general, are usually critical requirements to run production workloads, even when running pods and containers on a Kubernetes platform.

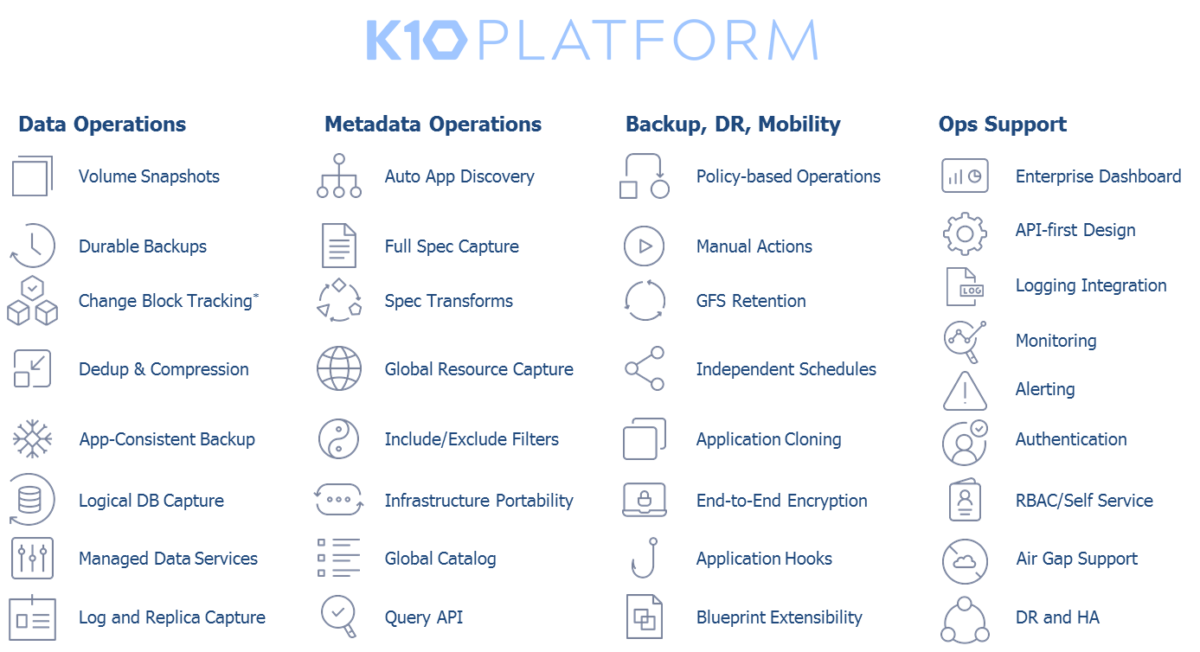
Veeam with Kasten can help enterprises overcome data management challenges and confidently run applications on Kubernetes clusters.

This vblog focuses on the integration of Kasten and vSphere with VMware Tanzu:

STEP1: helm repo add kasten https://charts.kasten.io/
STEP2: kubectl create namespace kasten-io
STEP3: kubectl get sc
STEP4: helm install k10 kasten/k10 –namespace=kasten-io –set

VMware : Tips of the week #5

You can SSH to a Tanzu Kubernetes cluster TKC worker node as the vmware-system-user using a private key.

Below are the seven steps to follow: 

  • STEP1: Connect to the supervisor cluster
  • STEP2: Switch context to supervisor cluster
  • STEP3: Get secret from specific namespace when your cluster is created
  • STEP4: View the key for the specific cluster
  • STEP5: The key is Base64 encoded, decode it
  • STEP6: Change the access for  the key 
  • STEP7: Connect to one of the worker node

Enjoy

VMware : How to identify the LEADER SupervisorControPlane in vSphere with Tanzu

In this post, we going to show you how you can connect to the supervisor cluster control plane nodes and identify the Leader for Kubernetes master within VMware vSphere with Tanzu. This is important for certain troubleshooting and analysis tasks.

As you maybe know the supervisor cluster is the Kubernetes cluster that we stand up inside of a vSphere cluster when enabling workload management.

The supervisor cluster like other Kubernetes clusters operates an active-passive multi-master model and only one master

VMware : Tips of the week #4

We want to share with you some concepts, helpful commands, and gotchas that we have come across during the first few days within the Kubernetes world.  

Kubernetes uses a command-line tool called kubectl for running commands against clusters,  you may find yourself frustrated by the time spent typing repetitive commands.

This article will highlight tips used to simplify the usage of kubectl and save you time.

Shell aliases can be used to shorten all shell commands and not just